> ## Documentation Index
> Fetch the complete documentation index at: https://telr-docs.cashfree.com/llms.txt
> Use this file to discover all available pages before exploring further.
# WooCommerce
> Easily manage checkout for your WooCommerce store with Telr.
# WooCommerce Integration Guide
Accept payments instantly on your Woocommerce store with our no-code payment gateway. We support all major payment methods including:
* UPI
* Credit Cards
* Debit Cards
* Net Banking
* Wallets
* Buy Now Pay Later (BNPL)
***
### 1. Sign Up and Set Up
1. **[Sign up with Cashfree](https://telr.cashfree.com/merchants/signup?source-action=docs%20page\&action=Sign%20Up\&button-id=StartNow_EcomPluginWooCom)** if you don’t have an account.
2. Submit the [required documents](https://knowledgebase.cashfree.com/support/solutions/articles/48001146022-what-are-the-documents-needed-for-activating-my-cashfree-account-).
***
### 2. Install the Telr Plugin
1. **[Download the plugin](https://wordpress.org/plugins/cashfree)** from WordPress.
2. **Log in** to your WordPress Admin Dashboard.
3. Upload and install the plugin in `/wp-content/plugins`.
4. **Activate the Telr Plugin** from the Plugins page.
***
### 3. Configure Telr in WooCommerce
1. Go to **WooCommerce** > **Settings** > **Checkout**.
2. Select **Telr** under Payment Gateways.
3. Enable Telr by checking the **Enable/Disable** box.
***
### 4. Enter Your Credentials
1. **App ID** and **Secret Key** from Telr:
* Enter your credentials in the Telr plugin settings.
2. Optional settings:
* **Sandbox Mode**: Check to enable test mode.
* **In-Context Payment**: Check to avoid redirection during payment.
**Click Save Changes** when finished.
**Note**: If you encounter an "Authentication Failed" error, clear the "Enable Telr Sandbox" checkbox.
***
### 5. Whitelist Your Domain
To complete the integration, request domain whitelisting:
* Navigate to **Developers > Whitelisting** in the Telr Dashboard.
* Follow the [whitelisting guide](/payments/online/go-live/whitelist).
***
## BNPL Plus Integration
### 1. Setup Guide
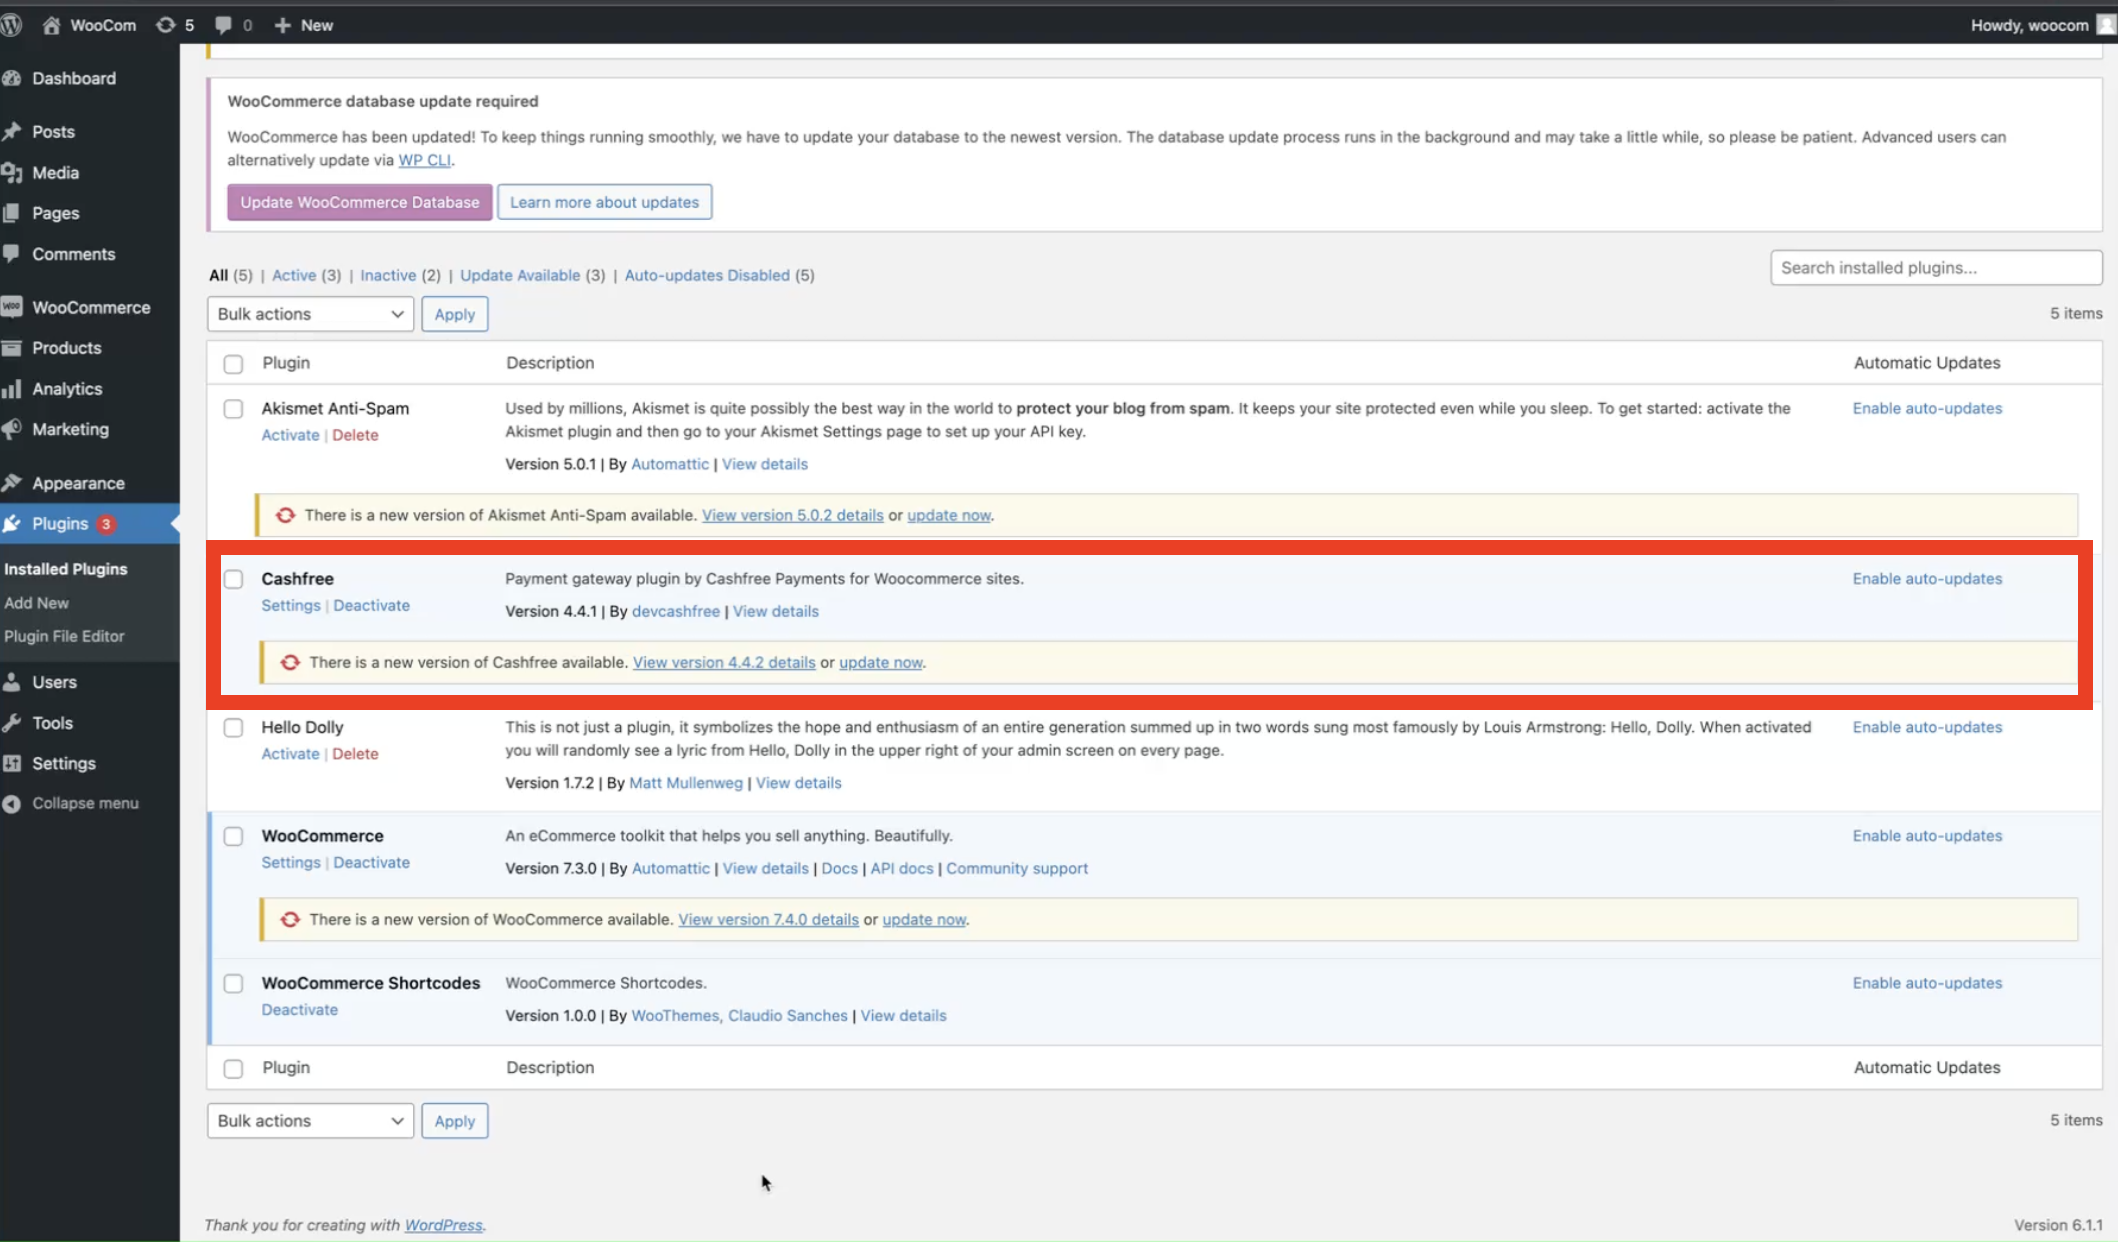
1. **Upgrade Telr Plugin**: Go to **WooCommerce Admin** > **Plugins** and update to the latest version.
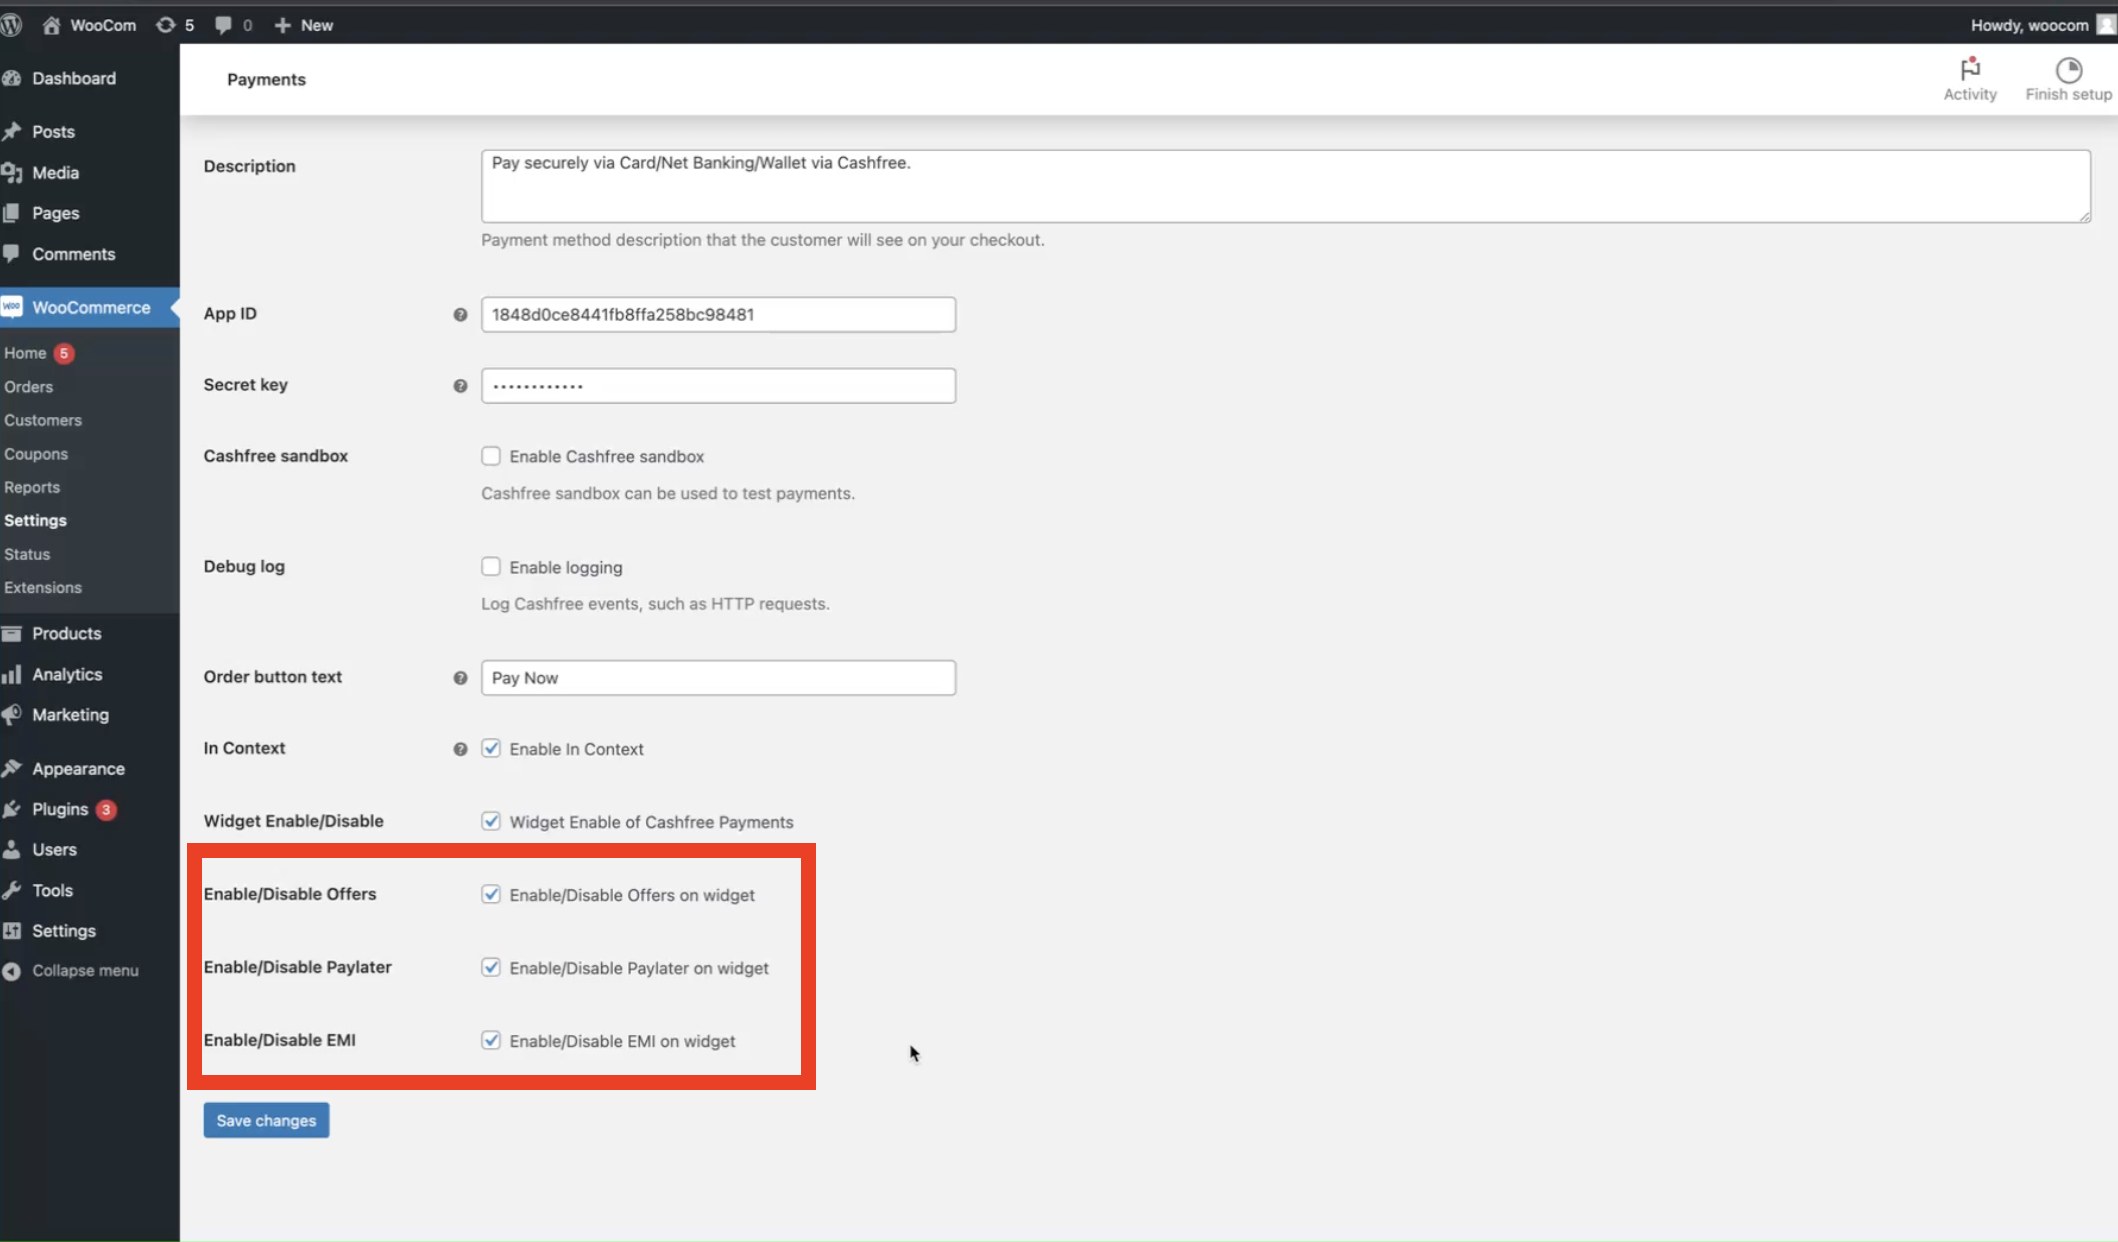
2. **Enable BNPL Options**: Go to Settings and activate:
* Offers, pay later, or EMI options as desired.
> **Done!** BNPL Plus will now display on your product pages.
***
### 2. Troubleshooting
**Common Errors and Solutions**
* **"Authentication Failed"**: Ensure Sandbox Mode is disabled in settings.
* **Domain Error**: Verify domain is whitelisted in the Telr Dashboard.
***
**Learn how to use other features to improve conversion using [offers](./coupons) and [cart recovery](./cart-recovery).**
***
 > **Done!** BNPL Plus will now display on your product pages.
***
### 2. Troubleshooting
**Common Errors and Solutions**
* **"Authentication Failed"**: Ensure Sandbox Mode is disabled in settings.
* **Domain Error**: Verify domain is whitelisted in the Telr Dashboard.
***
**Learn how to use other features to improve conversion using [offers](./coupons) and [cart recovery](./cart-recovery).**
***
> **Done!** BNPL Plus will now display on your product pages.
***
### 2. Troubleshooting
**Common Errors and Solutions**
* **"Authentication Failed"**: Ensure Sandbox Mode is disabled in settings.
* **Domain Error**: Verify domain is whitelisted in the Telr Dashboard.
***
**Learn how to use other features to improve conversion using [offers](./coupons) and [cart recovery](./cart-recovery).**
***