> ## Documentation Index
> Fetch the complete documentation index at: https://telr-docs.cashfree.com/llms.txt
> Use this file to discover all available pages before exploring further.
# External Analytics
> Unlock key insights to grow your business
With Telr, Checkout is no longer a black box. Track Checkout, Payment Links, and Payment Forms by pushing events to your favorite analytics provider.
Drive better conversions with Telr checkout by sending the events to your favorite Analytics provider.
Supported platforms
* Google Analytics
* Meta Pixel
* Mixpanel
You can access event tracking on Telr dashboard from
[here](https://telr.cashfree.com/merchants/pg/developers/checkout-analytics)
### Enable event tracking
To enable event tracking:
1. Log in to the [Merchant Dashboard](https://telr.cashfree.com/merchants) using your credentials.
2. Click *Access* under Payment Gateway section.
3. In the left navigation pane, go to **Developers** > **Checkout Analytics**.
4. Under the **Actions** column, select the **Edit** icon.
5. In the **External Analytics Configuration** modal:
* Enable **Broadcast events to Google** toggle.
* In **Measurement ID**, enter your Google Analytics ID.\
*See [Find the measurement ID](#find-the-measurement-id).*
* In **Access Token**, enter your Measurement Protocol API token.\
*See [Generate the access token](#generate-the-access-token).*
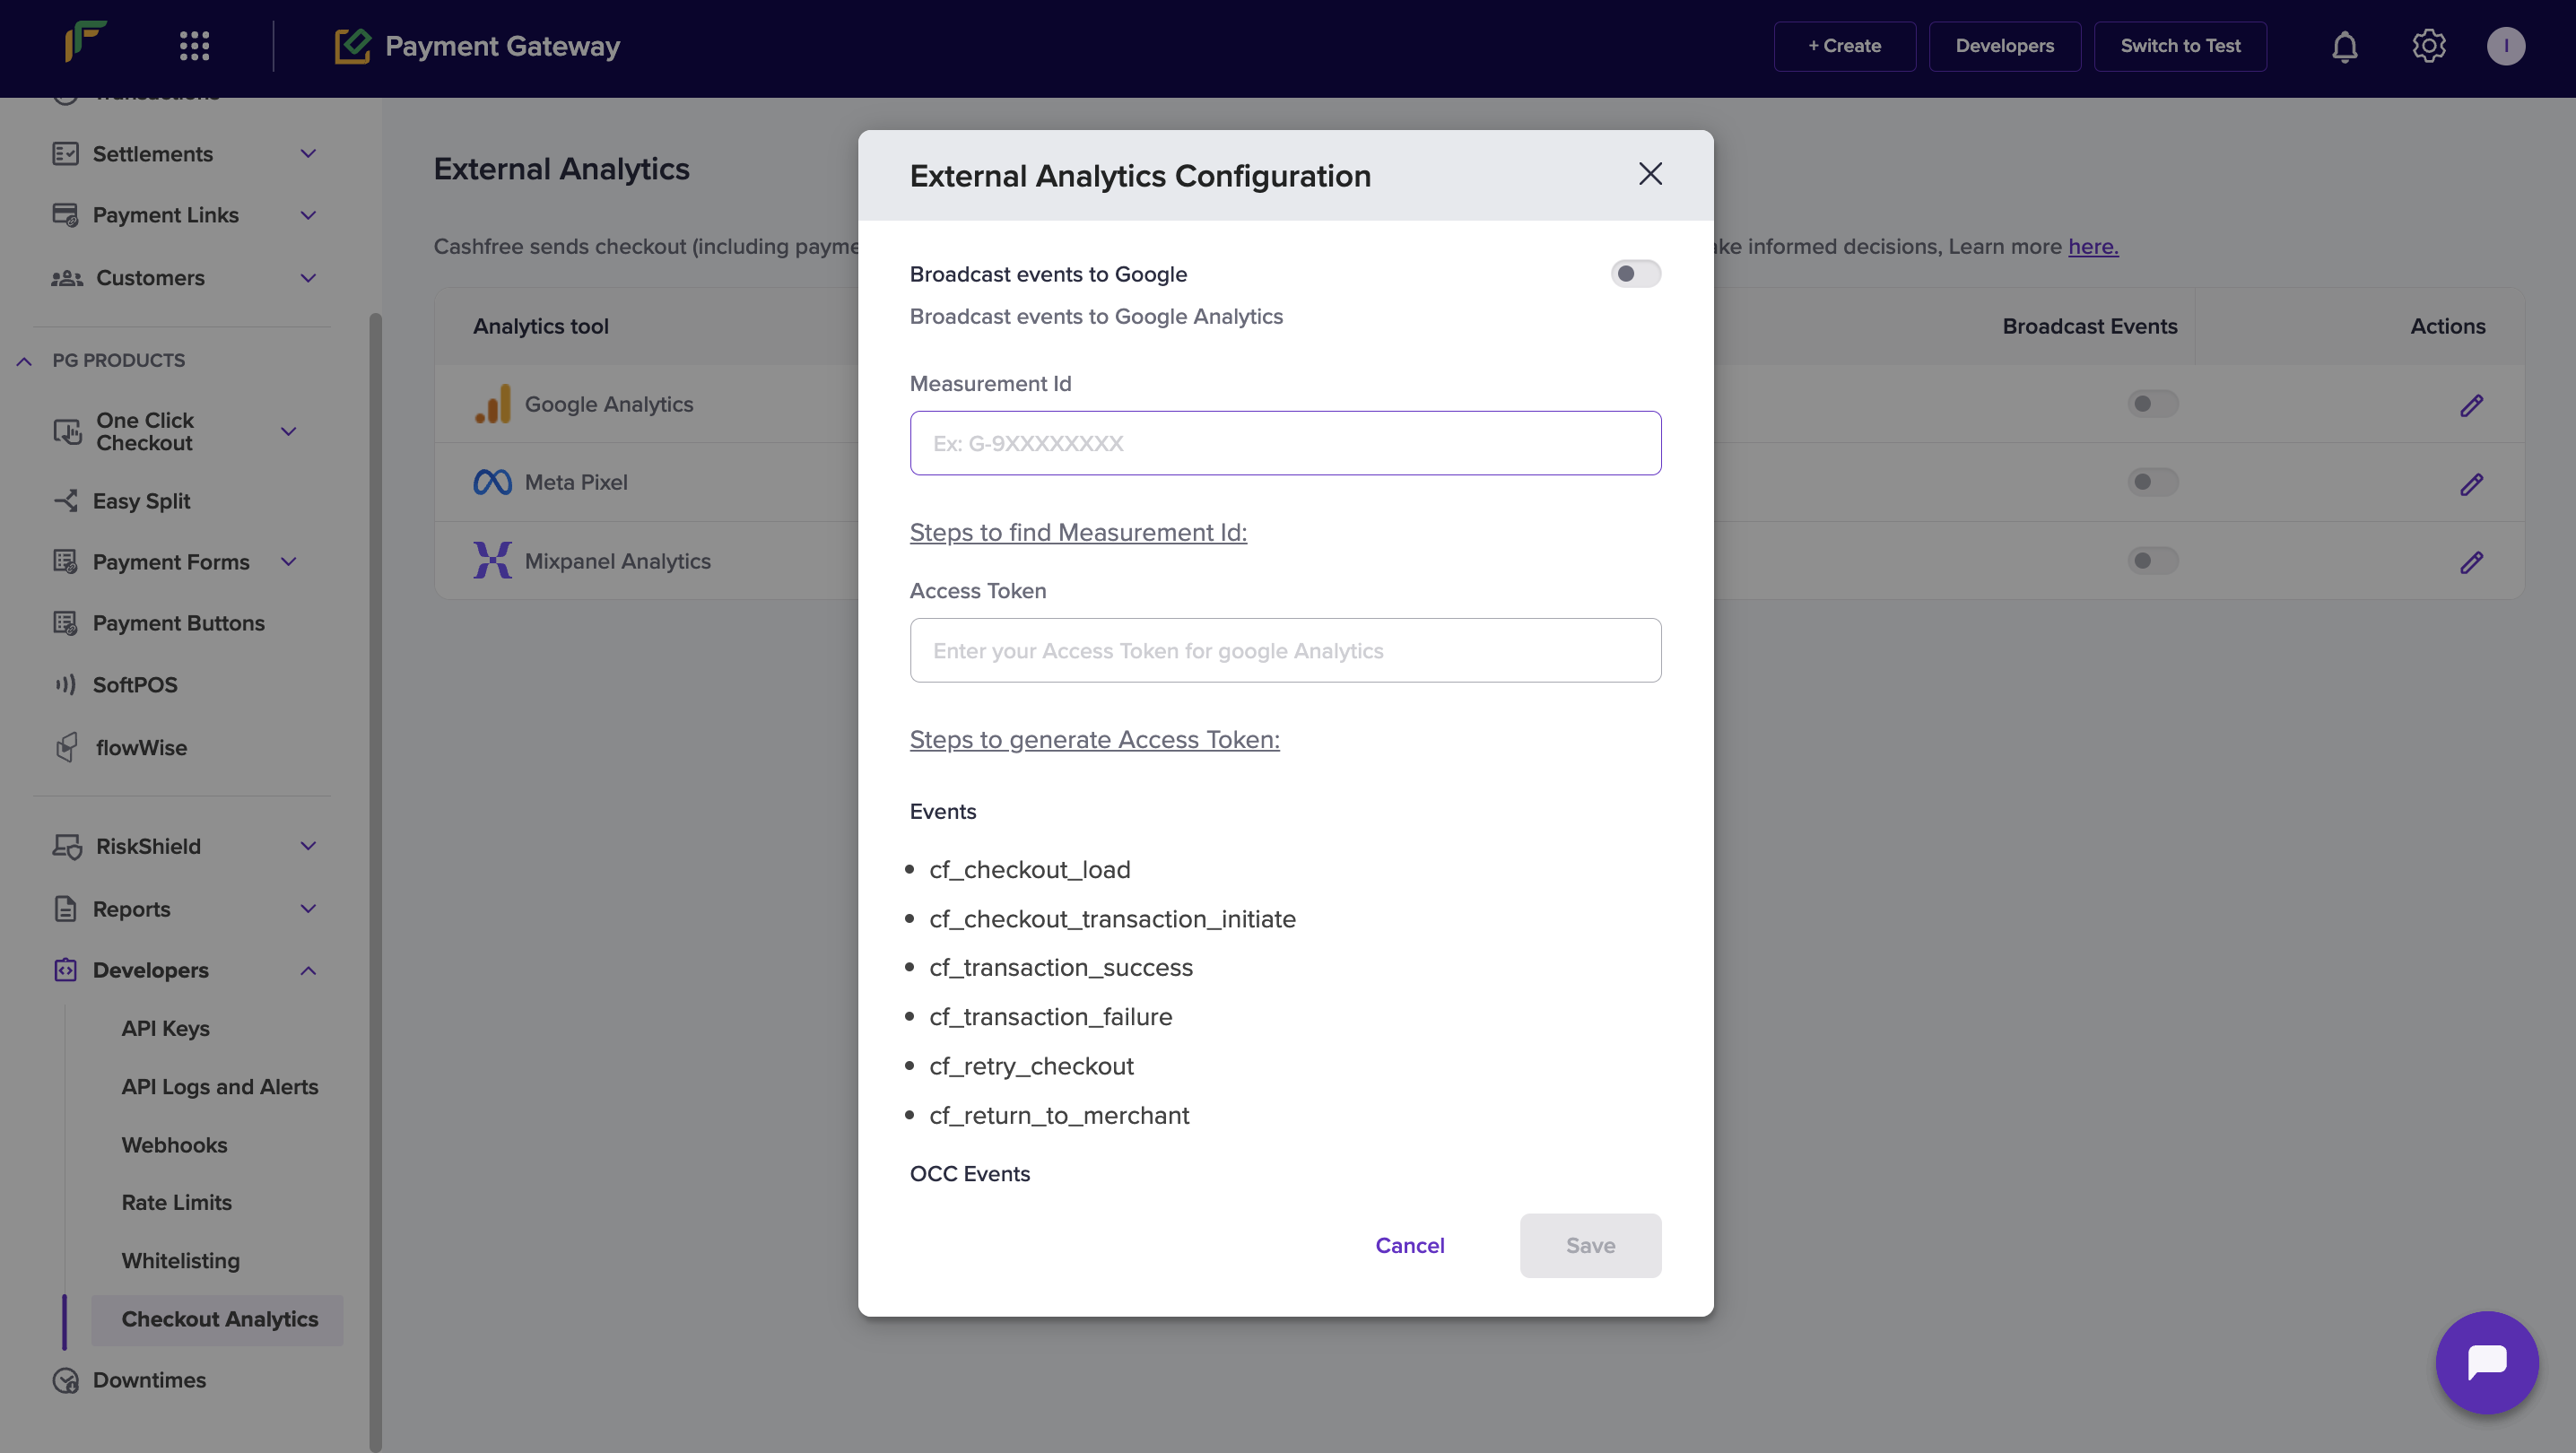 5. Select **Save** to apply your changes.
### Checkout events pushed to GA4
| Event Name | Description |
| ---------------------------------- | ---------------------------------------------- |
| `cf_checkout_load` | Checkout loaded successfully. |
| `cf_checkout_transaction_initiate` | Customer initiated a transaction. |
| `cf_transaction_success` | Transaction completed successfully. |
| `cf_transaction_failure` | Transaction failed. |
| `cf_retry_checkout` | Redirected to checkout after failure. |
| `cf_return_to_merchant` | Customer redirected back to the merchant page. |
### Events pushed on payment link or payment form
| Event Name | Event Meaning |
| :---------------------- | :------------------------------------------------- |
| `cf_pl_load` | Payment Link loaded successfully. |
| `cf_pf_load` | Payment Form Loaded successfully. |
| `cf_checkout_initiated` | Checkout initiated from Payment Link/Payment Form. |
| `cf_purchase_completed` | Payment completed successfully. |
### One Click Checkout events
When One Click Checkout is enabled, the following events are pushed to GA4:
| Event Name | Description |
| ------------------------------------ | ------------------------------------------------------------------------------------------ |
| `cf_checkout_payment_info_displayed` | Payment information displayed. |
| `cf_checkout_transaction_initiate` | Customer initiated a transaction by clicking a payment method. The transaction is created. |
| `cf_checkout_transaction_success` | Transaction completed successfully. Payment is done, and the order is placed. |
| `cf_checkout_address_collected` | Customer’s address collected and submitted to proceed with the checkout. |
| `cf_checkout_login_verify` | Customer login verified. Customer is logged into the checkout. |
| `cf_checkout_login_otp_sent` | OTP sent for login verification. |
| `cf_checkout_occ_load` | One-Click Checkout page loaded successfully. |
In case you want to send events to your analytics provider and don't find it in the above list, please reach out by filling the [Support Form](https://telr.cashfree.com/merchants/landing?env=prod\&raise_issue=1).
## Google Analytics
Set up Google Analytics by adding your Measurement ID and Access Token in the configuration modal.
### Find the Measurement ID
To identify your Measurement ID in Google Analytics:
1. Sign in to your **Google Analytics** account.
2. Go to **Admin** (bottom left).
3. Select **Data Streams**.
4. Open the relevant data stream.
5. Copy the **Measurement ID** and paste it into the **configuration modal**.
### Generate the Access Token
To generate your API token for event tracking:
1. Sign in to your **Google Analytics** account.
2. Go to **Admin**.
3. Select **Data Streams**.
4. Select **Measurement Protocol API secrets**.
5. Create a new **API secret** and paste it into the **configuration modal**.
## Meta Pixel
Set up Meta Pixel by adding your Pixel ID and Access Token in the configuration modal.
### Find the Pixel ID
To locate your Meta Pixel ID:
1. Sign in to your **Meta Events Manager**.
2. Go to **Pixel Settings**.
3. Copy the **Pixel ID** from the **Settings** section.
### Generate the Access Token
To generate an access token for server-side tracking:
1. Sign in to your **Meta Events Manager**.
2. Go to **Pixel Settings**.
3. Scroll to the **Conversions API** section.
4. Select **Generate Access Token**.
5. Copy the **Access Token** and paste it into the **configuration modal**.
## Mixpanel
Set up Mixpanel by retrieving your Project Token and adding it to the configuration modal.
### Find the Project Token
To retrieve your Mixpanel Project Token:
1. Sign in to your **Mixpanel** account.
2. Go to **Project Settings**.
3. Copy the **Project Token** from the **Settings** page.
5. Select **Save** to apply your changes.
### Checkout events pushed to GA4
| Event Name | Description |
| ---------------------------------- | ---------------------------------------------- |
| `cf_checkout_load` | Checkout loaded successfully. |
| `cf_checkout_transaction_initiate` | Customer initiated a transaction. |
| `cf_transaction_success` | Transaction completed successfully. |
| `cf_transaction_failure` | Transaction failed. |
| `cf_retry_checkout` | Redirected to checkout after failure. |
| `cf_return_to_merchant` | Customer redirected back to the merchant page. |
### Events pushed on payment link or payment form
| Event Name | Event Meaning |
| :---------------------- | :------------------------------------------------- |
| `cf_pl_load` | Payment Link loaded successfully. |
| `cf_pf_load` | Payment Form Loaded successfully. |
| `cf_checkout_initiated` | Checkout initiated from Payment Link/Payment Form. |
| `cf_purchase_completed` | Payment completed successfully. |
### One Click Checkout events
When One Click Checkout is enabled, the following events are pushed to GA4:
| Event Name | Description |
| ------------------------------------ | ------------------------------------------------------------------------------------------ |
| `cf_checkout_payment_info_displayed` | Payment information displayed. |
| `cf_checkout_transaction_initiate` | Customer initiated a transaction by clicking a payment method. The transaction is created. |
| `cf_checkout_transaction_success` | Transaction completed successfully. Payment is done, and the order is placed. |
| `cf_checkout_address_collected` | Customer’s address collected and submitted to proceed with the checkout. |
| `cf_checkout_login_verify` | Customer login verified. Customer is logged into the checkout. |
| `cf_checkout_login_otp_sent` | OTP sent for login verification. |
| `cf_checkout_occ_load` | One-Click Checkout page loaded successfully. |
In case you want to send events to your analytics provider and don't find it in the above list, please reach out by filling the [Support Form](https://telr.cashfree.com/merchants/landing?env=prod\&raise_issue=1).
## Google Analytics
Set up Google Analytics by adding your Measurement ID and Access Token in the configuration modal.
### Find the Measurement ID
To identify your Measurement ID in Google Analytics:
1. Sign in to your **Google Analytics** account.
2. Go to **Admin** (bottom left).
3. Select **Data Streams**.
4. Open the relevant data stream.
5. Copy the **Measurement ID** and paste it into the **configuration modal**.
### Generate the Access Token
To generate your API token for event tracking:
1. Sign in to your **Google Analytics** account.
2. Go to **Admin**.
3. Select **Data Streams**.
4. Select **Measurement Protocol API secrets**.
5. Create a new **API secret** and paste it into the **configuration modal**.
## Meta Pixel
Set up Meta Pixel by adding your Pixel ID and Access Token in the configuration modal.
### Find the Pixel ID
To locate your Meta Pixel ID:
1. Sign in to your **Meta Events Manager**.
2. Go to **Pixel Settings**.
3. Copy the **Pixel ID** from the **Settings** section.
### Generate the Access Token
To generate an access token for server-side tracking:
1. Sign in to your **Meta Events Manager**.
2. Go to **Pixel Settings**.
3. Scroll to the **Conversions API** section.
4. Select **Generate Access Token**.
5. Copy the **Access Token** and paste it into the **configuration modal**.
## Mixpanel
Set up Mixpanel by retrieving your Project Token and adding it to the configuration modal.
### Find the Project Token
To retrieve your Mixpanel Project Token:
1. Sign in to your **Mixpanel** account.
2. Go to **Project Settings**.
3. Copy the **Project Token** from the **Settings** page.