> ## Documentation Index
> Fetch the complete documentation index at: https://telr-docs.cashfree.com/llms.txt
> Use this file to discover all available pages before exploring further.
# Getting Started
> In this article, you will learn the things to do before testing our Payouts APIs.
Version 2 APIs: We have a new [version 2 APIs for Payouts](/api-reference/payouts/v2/payouts-api-v2-new). The v2 APIs represent a significant leap forward in payouts integration, offering enhanced versioning, standardized requests and responses, efficient troubleshooting, standardization across products, and simplified transfer APIs.
* [Download Postman Collection](/api-reference/payouts/getting-started-with-payouts-apis#download-postman-collection)
* [View End Points](/api-reference/payouts/getting-started-with-payouts-apis#view-end-points)
* [Generate API Keys](/api-reference/payouts/getting-started-with-payouts-apis#generate-api-keys)
* [Whitelist IP Address](/api-reference/payouts/getting-started-with-payouts-apis#whitelist-your-ip-address) / [Generate Signature](/api-reference/payouts/getting-started-with-payouts-apis#generate-signature)
* [Any Queries: Contact Us](/api-reference/payouts/getting-started-with-payouts-apis#any-queries-contact-us)
***
## Download Postman Collection
This collection can save you time because of easy access to different requests.
Download Telr Payouts Postman Collection
***
## View End Points
For [Payout v2 APIs](/api-reference/payouts/v2/payouts-api-v2-new), \[NEW]
| Environment | Base URL |
| :---------- | :------------------------------------------------------------------------- |
| Production | [https://api.cashfree.com/payout](https://api.cashfree.com/payout) |
| Test | [https://sandbox.cashfree.com/payout](https://sandbox.cashfree.com/payout) |
For Payout v1 and v1.2 APIs,
| Environment | Base URL |
| :---------- | :--------------------------------------------------------------------- |
| Production | [https://payout-api.cashfree.com](https://payout-api.cashfree.com) |
| Test | [https://payout-gamma.cashfree.com](https://payout-gamma.cashfree.com) |
Telr uses unique identifiers to allow access to the API. Once you have signed up at our merchant site, you can see your\*\* AppId \*\*and **SecretKey**. Each API request to the server requires these credentials.
Use this endpoint to verify your credentials: **/api/v1/credentials/verify**
***
## Generate API Keys
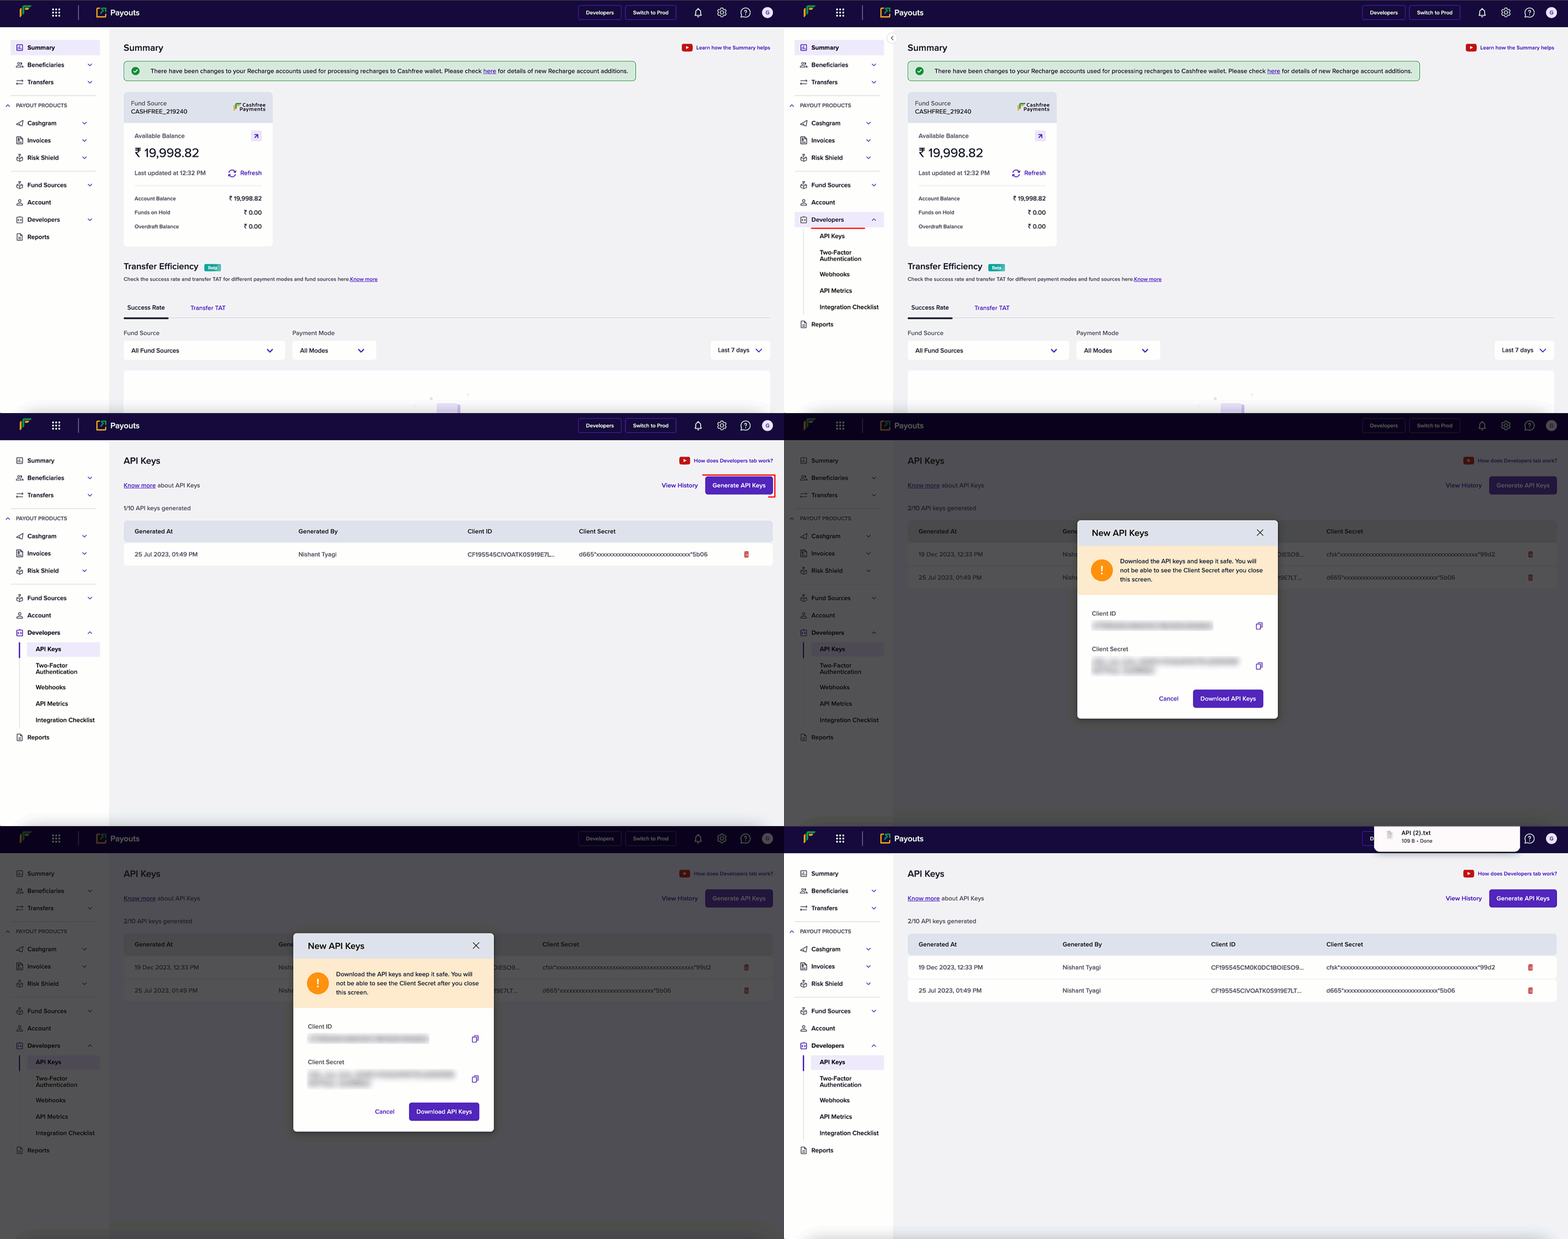
Follow the instructions below to generate API keys:
1. From the Payouts dashboard, click **Developers** on the navigation panel.
2. Click **API Keys**.
3. Click **Generate API Keys** from the *API Keys* screen.
4. The *New API Keys* popup displays with the client ID and client secret information.
5. Click **Download API Keys** to download the information and save them in your local system folder. Do not share the keys with anyone because they are confidential. You can generate a maximum of 10 API keys.
 API Keys - Production Environment: You need to perform an OTP authentication
to generate API keys for production environment.
***
## Identity Verification
Whitelisting the IP address or generating a signature provides a layer of authentication. These cybersecurity techniques prevent anonymous or unknown disbursement requests and allow only verified requests.
### Whitelist Your IP Address
Your IP address needs to be whitelisted in the Telr production server or it rejects all incoming requests.
Only the production environment needs approval from Telr and not
for the test environment.
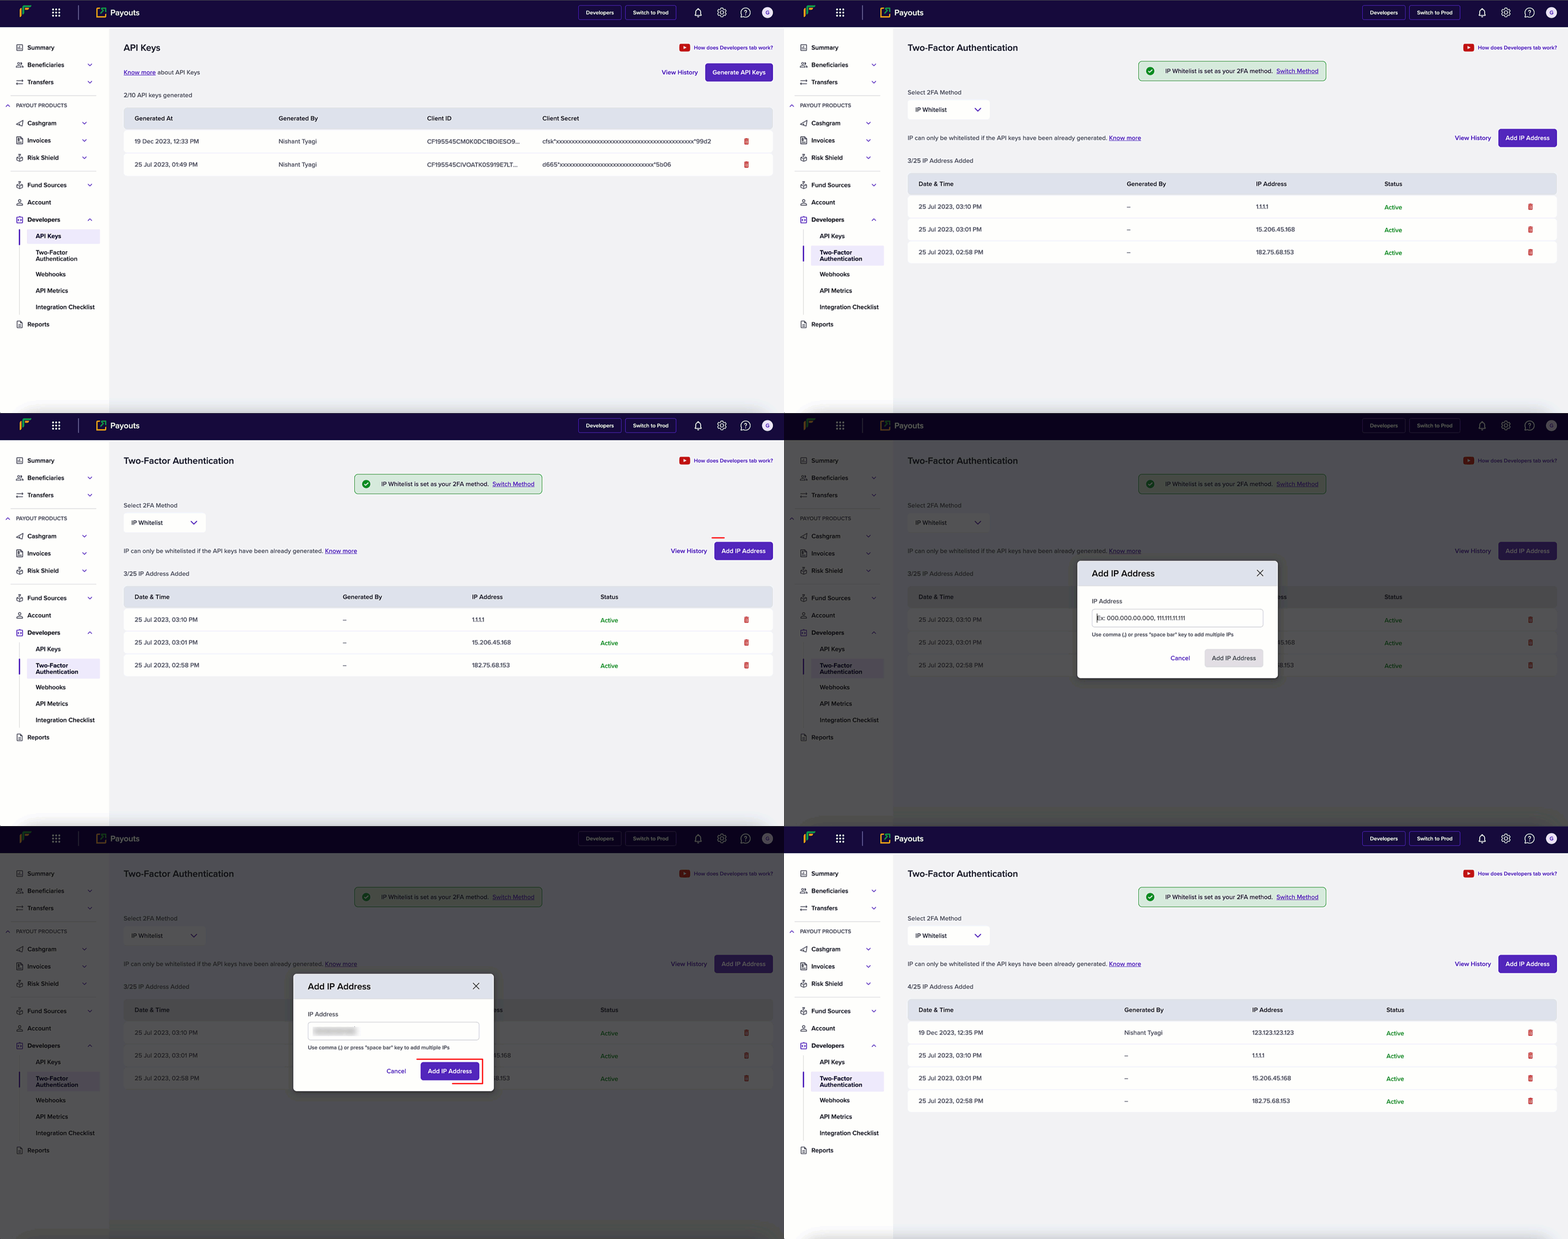
Follow the instructions below to whitelist your IP:
1. From the \_Payout\_s dashboard, click **Developers** > **Two-Factor Authentication**.
2. Choose **IP Whitelist** from the *Select 2FA Method* drop-down.
3. Click **Add IP Address**.
4. Enter the IP address you want to whitelist in the respective field and click **Add IP Address** to save the details. Note that the IPv4 has to be whitelisted, and not IPv6. The whitelisted IPs are displayed in the grid as shown below. You can whitelist a maximum of 25 IPs.
API Keys - Production Environment: You need to perform an OTP authentication
to generate API keys for production environment.
***
## Identity Verification
Whitelisting the IP address or generating a signature provides a layer of authentication. These cybersecurity techniques prevent anonymous or unknown disbursement requests and allow only verified requests.
### Whitelist Your IP Address
Your IP address needs to be whitelisted in the Telr production server or it rejects all incoming requests.
Only the production environment needs approval from Telr and not
for the test environment.
Follow the instructions below to whitelist your IP:
1. From the \_Payout\_s dashboard, click **Developers** > **Two-Factor Authentication**.
2. Choose **IP Whitelist** from the *Select 2FA Method* drop-down.
3. Click **Add IP Address**.
4. Enter the IP address you want to whitelist in the respective field and click **Add IP Address** to save the details. Note that the IPv4 has to be whitelisted, and not IPv6. The whitelisted IPs are displayed in the grid as shown below. You can whitelist a maximum of 25 IPs.
 ### Generate Signature
To generate a signature, you need to generate the public key. You then use the generated public key to generate the signature.
#### Generate Public Key
1. From the *Payouts* dashboard, click **Developers** > **Two-Factor Authentication**.
2. Select **Public Key** from the *Select 2FA Method* drop-down.
3. Click **Generate Public Key**.
4. The public key is downloaded to your computer. Use your registered email ID to access the key.
#### Generate Signature
Below are the steps to generate your signature:
1. Retrieve your clientId (one which you are passing through the header X-Client-Id )
2. Append this with CURRENT UNIX timestamp separated by a period (.)
3. Encrypt this data using RSA encrypt with Public key you received – this is the signature.
4. Pass this signature through the header X-Cf-Signature.
In the case of using our library, go through the libraries section. During the initialization process, you need to pass the key as a parameter.
```php PHP theme={null}
";
$publicKey =
openssl_pkey_get_public(file_get_contents("/path/to/certificate/public
_key.pem"));
$encodedData = $clientId.".".strtotime("now");
return static::encrypt_RSA($encodedData, $publicKey);
}
private static function encrypt_RSA($plainData, $publicKey) { if (openssl_public_encrypt($plainData, $encrypted, $publicKey,
OPENSSL_PKCS1_OAEP_PADDING))
$encryptedData = base64_encode($encrypted);
else return NULL;
return $encryptedData;
}
?>
```
```java Java theme={null}
private static String generateEncryptedSignature(String clientIdWithEpochTimestamp) {
// String clientIdWithEpochTimeStamp = clientId+"."+Instant.now().getEpochSecond();
String encrytedSignature = "";
try {
byte[] keyBytes = Files
.readAllBytes(new File("/Users/sameera/Downloads/payout_test_public_key.pem").toPath()); // Absolute Path to be replaced
String publicKeyContent = new String(keyBytes);
System.out.println(publicKeyContent);
publicKeyContent = publicKeyContent.replaceAll("[\\t\\n\\r]", "")
.replace("-----BEGIN PUBLIC KEY-----", "").replace("-----END PUBLIC KEY-----", "");
KeyFactory kf = KeyFactory.getInstance("RSA");
System.out.println(publicKeyContent);
X509EncodedKeySpec keySpecX509 = new X509EncodedKeySpec(
Base64.getDecoder().decode(publicKeyContent));
RSAPublicKey pubKey = (RSAPublicKey) kf.generatePublic(keySpecX509);
final Cipher cipher = Cipher.getInstance("RSA/ECB/OAEPWithSHA-1AndMGF1Padding");
cipher.init(Cipher.ENCRYPT_MODE, pubKey);
encrytedSignature = Base64.getEncoder().encodeToString(cipher.doFinal(clientIdWithEpochTimestamp.getBytes()));
System.out.println(encrytedSignature);
} catch (Exception e) {
e.printStackTrace();
}
return encrytedSignature;
}
```
```python Python theme={null}
from cashfree_sdk.payouts import Payouts
// Initialise the SDK, pass public key for dynamic IP
Payouts.init("", "", "PROD", public_key= b'public key')
```
```javascript Node theme={null}
//require CashfreeSDK
const cfSdk = require("cashfree-sdk");
//access the PayoutsSdk from CashfreeSDK
const { Payouts } = cfSdk;
// Instantiate Telr Payouts
const payoutsInstance = new Payouts({
env: "TEST",
clientId: "",
clientSecret: "",
pathToPublicKey: "/path/to/your/public/key/file.pem",
//"publicKey": "ALTERNATIVE TO SPECIFYING PATH (DIRECTLY PASTE PublicKey)"
});
```
***
## Any Queries: Contact Us
For identifying, diagnosing, and resolving problems related to API requests, ensure the information below is communicated while contacting us:
* Share the API request and response details along with only **x-client-ID**.
* Mention the registered email ID and environment in the email.
* Use your registered email address (with Telr) to send the email or mention the registered email address.
* Include your account manager in the CC of the email request.
For dashboard queries, share the screenshot and .har file of the screen.
### Generate Signature
To generate a signature, you need to generate the public key. You then use the generated public key to generate the signature.
#### Generate Public Key
1. From the *Payouts* dashboard, click **Developers** > **Two-Factor Authentication**.
2. Select **Public Key** from the *Select 2FA Method* drop-down.
3. Click **Generate Public Key**.
4. The public key is downloaded to your computer. Use your registered email ID to access the key.
#### Generate Signature
Below are the steps to generate your signature:
1. Retrieve your clientId (one which you are passing through the header X-Client-Id )
2. Append this with CURRENT UNIX timestamp separated by a period (.)
3. Encrypt this data using RSA encrypt with Public key you received – this is the signature.
4. Pass this signature through the header X-Cf-Signature.
In the case of using our library, go through the libraries section. During the initialization process, you need to pass the key as a parameter.
```php PHP theme={null}
";
$publicKey =
openssl_pkey_get_public(file_get_contents("/path/to/certificate/public
_key.pem"));
$encodedData = $clientId.".".strtotime("now");
return static::encrypt_RSA($encodedData, $publicKey);
}
private static function encrypt_RSA($plainData, $publicKey) { if (openssl_public_encrypt($plainData, $encrypted, $publicKey,
OPENSSL_PKCS1_OAEP_PADDING))
$encryptedData = base64_encode($encrypted);
else return NULL;
return $encryptedData;
}
?>
```
```java Java theme={null}
private static String generateEncryptedSignature(String clientIdWithEpochTimestamp) {
// String clientIdWithEpochTimeStamp = clientId+"."+Instant.now().getEpochSecond();
String encrytedSignature = "";
try {
byte[] keyBytes = Files
.readAllBytes(new File("/Users/sameera/Downloads/payout_test_public_key.pem").toPath()); // Absolute Path to be replaced
String publicKeyContent = new String(keyBytes);
System.out.println(publicKeyContent);
publicKeyContent = publicKeyContent.replaceAll("[\\t\\n\\r]", "")
.replace("-----BEGIN PUBLIC KEY-----", "").replace("-----END PUBLIC KEY-----", "");
KeyFactory kf = KeyFactory.getInstance("RSA");
System.out.println(publicKeyContent);
X509EncodedKeySpec keySpecX509 = new X509EncodedKeySpec(
Base64.getDecoder().decode(publicKeyContent));
RSAPublicKey pubKey = (RSAPublicKey) kf.generatePublic(keySpecX509);
final Cipher cipher = Cipher.getInstance("RSA/ECB/OAEPWithSHA-1AndMGF1Padding");
cipher.init(Cipher.ENCRYPT_MODE, pubKey);
encrytedSignature = Base64.getEncoder().encodeToString(cipher.doFinal(clientIdWithEpochTimestamp.getBytes()));
System.out.println(encrytedSignature);
} catch (Exception e) {
e.printStackTrace();
}
return encrytedSignature;
}
```
```python Python theme={null}
from cashfree_sdk.payouts import Payouts
// Initialise the SDK, pass public key for dynamic IP
Payouts.init("", "", "PROD", public_key= b'public key')
```
```javascript Node theme={null}
//require CashfreeSDK
const cfSdk = require("cashfree-sdk");
//access the PayoutsSdk from CashfreeSDK
const { Payouts } = cfSdk;
// Instantiate Telr Payouts
const payoutsInstance = new Payouts({
env: "TEST",
clientId: "",
clientSecret: "",
pathToPublicKey: "/path/to/your/public/key/file.pem",
//"publicKey": "ALTERNATIVE TO SPECIFYING PATH (DIRECTLY PASTE PublicKey)"
});
```
***
## Any Queries: Contact Us
For identifying, diagnosing, and resolving problems related to API requests, ensure the information below is communicated while contacting us:
* Share the API request and response details along with only **x-client-ID**.
* Mention the registered email ID and environment in the email.
* Use your registered email address (with Telr) to send the email or mention the registered email address.
* Include your account manager in the CC of the email request.
For dashboard queries, share the screenshot and .har file of the screen.